Wednesday, October 5, 2011

Line leader rope

I teach nursery {18 months to 3 years old} at church. I love it. During the 2-ish hours we spend together, we like to take a walk around the outside of the church and talk about the pretty flowers, and the grass and the sky. Sometimes we chase bubbles, sometimes we play ring around the roses, sometimes we play spin and spin until you fall down, and sometimes we play c'mon honey, let's not play with those rocks, or I know that pit with a grate covering it is fascinating, but let's keep walking! {they ALL get distracted by this 5ft x5ft grate in the grass on the lawn of the church...}

anyway, with 8-10 munchkins out at a time, and two adults keeping track of them, the almost 3 year olds cruising ahead, and the eighteen-month olds barley toddling along trying to keep up, we needed a line leader rope.
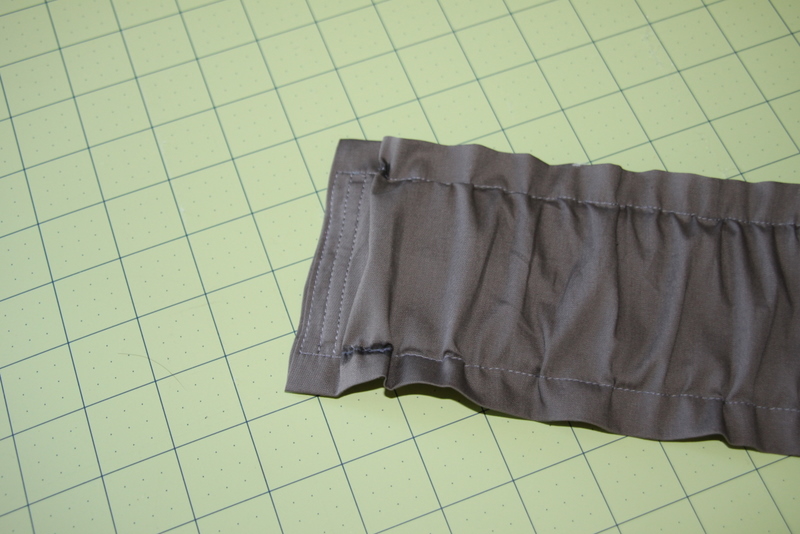
They sell these online for anywhere from $25-50 bucks, I made mine for $6.
It's just webbing (that I happened to have a ton of in my stash) with the loops covered in WILD ribbon (each spool cost $2 on sale at Hobby Lobby, wasn't a necessity, but I'm glad I didn't leave it plain. The loops are spaced about 12 -15 inches apart.

Each child grabs hold of one of the loops and as we walk, they all stay together! I've seen these used in pre-school for outings, especially great for crossing the street etc.

This little beauty will keep 12 little people all together and safe during our walks! I can't wait to try it out!
The little man HAS to be in the pictures I'm taking lately, he thinks he's so funny. He is :)

I don't have an action shot of this yet, but it will be awesome.
I'm remembering having something similar to this when I was little, it was just a white rope with knots tied in it every 12 or so inches and we each had to grab onto a knot. Anyone else remember those?

Monday, October 3, 2011

Labels for Jenni

I know I have been MIA for, well, too long...but I am back. I don't make any promises as to how often I will post, but definitely more than the last few months :)

During nap time today, I whipped up a batch of labels for my SIL Jenni, she requested some cute labels to put on the things she sews her three little munchkins. All her outfits are DARLING! See??!! This is just one of the most recent ones!
I was happy to oblige, the least I could do after she took our family photos last time she was here, she's also an amazing photographer! See??? Awe, cute.
She wanted some girly-and some boyly...
{no I don't think that is a word, but my six year old niece Lily says it all the time }
...with owls and monkeys, I threw in the tricycle ones for fun :)

In case you forgot, I used this tutorial here :)

Thanks for giving me the excuse to make these darling labels Jenni!

Sunday, August 14, 2011

And the winner is....

The winner of the giveaway is KEIRA!!! I used random.org to pick a winner, but I don't know how to post the image of the number...I'm not so savvy that way, but the winner is KEIRA!!! CONGRATULATIONS Keira, your little one due in December will surely enjoy these goodies!!!

Monday, August 8, 2011

GIVEAWAY! My 50th SALE on ETSY!!!!

I just made my 50th sale on Etsy! It's a milestone for me, and I want to celebrate! So...if you have a little one, or know someone with a little one, or are going to have a little one, or...you get the idea, then you NEED some Binky clips and Drool Bibs!

See? Binky clips keep that binky from falling to the ground and getting saturated with yucky dirt, lint and mysterious hair! I also use mine as a toy leash, clip one end to the stroller, baby backpack, sling, carseat, shopping cart, and a toy on the other end, and when baby throws the toy overboard, you don't lose it, or have to pick it up, or have to search the car for it! :)
Buckaroo Bandana Drool Bibs, Everett was such a DrOoLer!!! These drool bibs are super absorbent with chenille on the back and they stay super soft. I hated putting bibs on everett because they weren't that cute, it looked like he was getting ready to eat all the time, but the bandana style drool bibs are like a functional accessory! So cute!

In my shop, I have Buckaroo Bandana Drool Bibs...
Binky Clips...
and I also have ties! :)

Winner will receive their choice of -ANY- 2 binky clips and 2 drool bibs from my shop
Here's how to enter:
-Check out my etsy shop: PLaY
-Follow my blog
-Leave me a comment saying you follow, and who you would give your baby treasures to! {Leave your email so I can contact you}

Giveaway will close Saturday Night, tell your friends!!! I'll announce the winner on Sunday! :)

Wednesday, July 13, 2011

Bow Belt in MUSTARD yellow :)

So now I am itching to make more and more of these beauties! This Navy blue and White number (A Ross score for $5.99, no I am not joking) needed a little yellow accessory, so I made another bow belt :)
I know I look a smidge pregnant or something in the above photo, but I promise I'm not, the wind blew the dress so I look a little more plump than I am...forgive me :)
Close up :) I wanted this one to be more ruffled than the last one, so I added more to the length of the belt (fabric tube, not the elastic)
I love how ruffly it looks :) Now I am looking for more things to wear with it! :)
Have I convinced you you need to make one yet?!

Monday, July 11, 2011

Bow-Belt, Loose tutorial :)

So this is how I made the bow belt...I say loose tutorial because nothing I did here is exact, you can totally wing it and modify it to fit your needs :)

For the BELT:
1 piece of fabric that measures 9 in wide by your bra size x 1.3 ish, so my bra size is 34, and my piece of fabric was 44 in long {if you want more scrunchy/ruffly do more, if you want less...you get the idea}
1 piece of WIDE elastic{mine was 2.5 in wide} that measures your bra size {after you thread it through the belt you'll trim 1.5-2 inches off depending on how tight you want it, and where it's going to sit on your body.
Snaps or Velcro, I used 3 snaps in the back, they are using snaps at the stores too...if you do use snaps, I like the "snapsource" snaps because their prongs are extra long and will stab through the layers of elastic and velcro easier, though it is still a struggle and velcro would have been much easier...pick your poison :)
cut your fabric per your specific measurements, I wanted my belt to be 3.5-4 in. wide, so my fabric was 9 inches wide

sew it into a tube and turn it right side out, press it with the seam in the middle of the back

Sew a straight seam about 5/8 from the edge, this is the part that will ruffle when your elastic is in, repeat for the other side :) so it looks like this:
Make sure your elastic will fit in between the seams
using a big safety pin, thread the elastic all the way through the tube
fold one end in and press it, sew it down with one end of elastic inside
Pull your elastic through and put it up to your body to see how tight you want it, then with the right amount of elastic out of the belt, sew a satin stitch (tight zig-sag stitch) down the end of the belt,
I put fray check on the end and then trim off the excess elastic {it's not pretty but It will be hidden by the velcro or snaps anyway :)
For the BOW:
One piece of fabric that is 4 x17 in (I wanted a bow that was 8 inches long)
one piece of felt that is 3.5x8 in
one piece of fabric that is 4x3
Sew the felt onto the folded piece of fabric and leave an opening for turning it right side out in the center of one of the sides, sew right on the line, like barely a millimeter onto the felt
snip the corners and turn right side out, sew the small piece of fabric into a tube adn turn it right side out, press them both
here's what the pressed bow piece should look like:
scrunch it up till you like the way it looks and sew it by hand, I like to sew through the middle then wrap a few times around the middle of the bow with my thread
wrap the small tube around the middle section and sew it on in the back, doesn't have to be pretty, just so its secure :)
Stitch it onto the middle of the belt, by whatever means works for you :) Mine does NOT look pretty, but it sure is secure :)

I also tacked down each corner of the bow to the belt so it wouldn't look funny, or crooked, or sag :)
I forgot to take photos, but I put 3 snaps in the back and...
TADA!!!! Super cute Bow belt!!1
Lovely right?
See this belt in Yellow HERE

Sunday, July 10, 2011

Bow Belt

I know my crafty posts have been lacking lately, but not because I haven't been crafting, it's just that things seem to take priority over documenting the cute stuff I'm working on, but here's a teaser for a belt I just made, and I'll post loose instructions and photos tomorrow {hopefully} about how I did it....cute.
My sister Stephanie bought a super cute belt with a big bow on the front from Rue 21, and I regretted not getting one too...
I loved this dress, but it needed a little su'm su'm to look complete, so using the idea of the big bow belt that my sister has, I made this cute grey belt to match my dress :) I LOOOOVE the way it turned out, and I think I'll have to make a few more in different colors!
I'll have a tutorial tomorrow to show you how I did it, it was much easier than I thought it would be, and I LOVE the final product! Stay tuned!
See the tutorial HERE
and the same belt HERE in Yellow :)

Friday, July 1, 2011

Sesame Chicken

I was in the mood for Sesame Chicken, but the recipe I usually use has you bread the chicken and then fry it, then coat it with the sauce...I wanted something more healthy and less time consuming, this came together in like 10 minutes :)
YUMMY Sesame Chicken
{Amy, do you love the napkin I used for the backdrop? I do! :) }

  • This recipe came from Food.com, posted by Jenny White
  • My modifications are in BLUE :)
  • {I started my rice in the rice cooker before I started cooking, and I had the chicken thawing all afternoon}
  • 6 boneless skinless chicken breast halves, pat dry with paper towels
  • 1/2 cup honey
  • 1/2 cup soy sauce
  • 1 cup water
  • 2 tablespoons cornstarch
  • 1/2-1 teaspoon ground ginger (fresh is better) {I used a dash of ginger powder, it was tasty}
  • 1/2-1 teaspoon red pepper flakes (optional)
  • 1 tablespoon toasted sesame seeds {Sesame Seeds can be pricey if you try to buy a small spice-sized container of them at the grocery store, but I bought mine in bulk from Honeyville Grains, 13 oz for $6.99}

  • {I added chopped onions, chopped garlic and about 2 minutes before it was ready I threw in some halved sugar snap peas}

  • Directions:
  • 1 Cut chicken breast into 1 inch strips or bite size pieces.
  • 2 Heat a large non-stick skillet that has been sprayed with Pam, over medium-high heat.{I put in some vegetable oil and little bit of sesame seed oil}
  • 3 Cook chicken for about 6 minutes or until no longer pink.
  • 4 Mix together honey, soy sauce, water, corn starch, ginger and red pepper flakes.
  • 5 Whisk until no corn starch lumps appear.
  • 6 Pour sauce mixture into skillet with chicken.
  • 7 Cook until sauce thickens slightly.
  • 8 You can add more water if sauce is too thick.
  • 9 Sprinkle with sesame seeds.
  • 10 Cover and simmer for 10 minutes or until chicken starts to soak up the sauce.

  • Serve over rice, ENJOY!!!


    Monday, June 20, 2011

    Spray Painting, update

    So, I have been a little MIA, but not because I haven't been working hard and crafting it up, because I have. I have been working on a bajillion things at once, tell me I'm not the only one with crafting ADD...All of these beauties are getting ready to be primed and painted! The buckets are metal pails, they are Pottery Barn, but I got them at DOWNEAST for .50 cents! They are gonna be CUTE! The star and frames don't have a specific home yet, but then again, I don't have a thing on any of my walls yet...I know.

    So this is like a third of what I've been spray painting, and working on, I bought a dresser for $10 at a yard sale this weekend, and a side table thing to hold piano books in the living room for $5 a couple weekends ago...the projects are really piling up...

    I'm also getting ready for a craft show in Jackson Hole in August, I've been sewing about 20 bibs a day this week...

    I'm also tutoring 2 kids for an hour each every day at the library ( very nice little side job ot earn some spending/decorating/crafting moolah)


    So, I'm busy...
    But I'll be sure to keep you posted on my progress!!!
    Thanks so much for reading!

    Tuesday, June 14, 2011

    Ganache in the microwave!

    WHAT is Ganache you ask? It's a chocolatey goodness made with chocolate chips and cream, and can be used in a variety of delicious ways. I LOVE ganache, and I like to do mine in the microwave because I only have to dirty one dish, and it takes all of a minute or two! Really!

    I use Ganache primarily to frost chocolate cake or brownies, but you can also eat it warm with fresh strawberries, on top of ice cream, chilled, whipped, and piped onto cuppy-cakes, rolled into balls and dusted with cocoa or powdered sugar, like a truffle, or my personal favorite, just dig in with a spoon...can't help it!

    So here's how you make it:
    You'll need
    2 cups chocolate chips (I use the "Ambrosia" semi-sweet from Costco...mmm...(any kind of quality chocolate chip would work, milk chocolate chip would work as well)
    1 cup heavy whipping cream
    Start with your chips in a microwave safe bowl
    pour on the cream, just like a bowl of cereal

    nuke in the microwave 45 seconds, stir, then nuke another 30 seconds, then stir...
    The warm cream will start to melt the chips, stir it up
    keep stirring (it will look like it's not going to combine, but it will, and if you feel the need, you can microwave it for another 20 seconds or so
    keep stirring...I know it looks lumpy and like something has gone terribly wrong, but keep stirring :)
    and stirring...
    And voila!!! Truly rich chocolate to use for whatever you please!

    When I am going to frost a cake with it, I put it in the fridge fro a half an hour or so, but it would also be pretty poured on top of a bundt cake or something...or on top of ice cream, you know...whatev

    It's my new go-to dessert topping! MMmmmmmmmmm!!!