Showing posts with label Home improvement. Show all posts

Thursday, April 28, 2011

Staining Concrete Basement: part 2, Finished Product

So, I forgot my camera on moving day, so I didn't get to get a shot of the basement without all our stuff in it, but you can still see how cool it turned out, I like it a lot. I wanted to do a clear shiny coat on top, but I got out voted by the hubbs, and since this is his "man-cave" he gets to win this one :)
Looks kinda mottled...and cool:) I like the variation of the dark and light spots in it


We are in desperate need of food storage shelving...in due time I suppose, but for now this is the reality of our basement haha, good luck finding what I need eh?
Speaking of reality....this is what our living room looks like right now...coming together? ha ha, moving is the pits, but it IS super fun finding the perfect place to put everything in our OWN house, and having room for it all. I am kind of afraid to put any holes in the walls, they are so perfect right now lol! What do I do?!
Well, that's the progress, stay tuned for more updates, although I won't be posting a thing this weekend because we're going to ZION NATIONAL PARK with 2 of the sibs! Can't wait!

Wednesday, April 27, 2011

Epoxy/Painting the garage


Remember how concrete gives me the heebies? Well, we decided to do an epoxy/paint seal on our garage floor to make it...nicer :) We wanted to get it done before we moved in so we wouldn't have to move everything out of the garage to do it, we knew it would probably never come to pass...

So here's how we did it, INCLUDING all our mistakes along the way (So you're sure NOT to make them!)

Step 1: SWEEP/Squirt
We swept all the dirt out of the garage, and then to make sure it was super clean, we used a hose with a good pressure nozzle to squirt it all out.
Step 2: Scrubbing/Etching
We used the Quikrete bond-lok again, it took about 3/4 of a bottle for our 400 square foot garage. After you follow the directions on the bottle, rinse it really well. Then let it dry overnight.
All cleaned and etched:
Step 3: Paint
The next day we came back and started by cutting in with a paint brush (painting all the edges and cracks) Then we filled in with a roller.
{Now here's where we made the mistake...embarrassing right? We didn't read the directions all the way...ugh. We thought, okay, paint it, slap it on, sprinkle color flakes, done. Well, you're supposed to start with a LIGHT coat over the whole thing, to make a good bond, and then go over it with a heavy coat. DOH! We just did one heavy coat. It has chipped in a few places already because we were stupid and didn't read the directions. DO NOT make the same mistake! }

We used Seal-Krete, and had it tinted to "charcoal grey" We used 2 full cans for our 400 square foot garage, we were very liberal with the paint. It cost $27 for each can
We also used Quikrete color chips to give it a little texture, we chose the above colors a mix of black white and grey flakes. We used one can of flakes for our whole garage. They cost about $8

cutting in, getting right to it

I was the sprinkle-fairy...that part was kinda fun!

finishing it all off

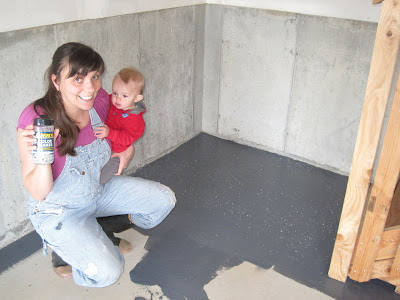
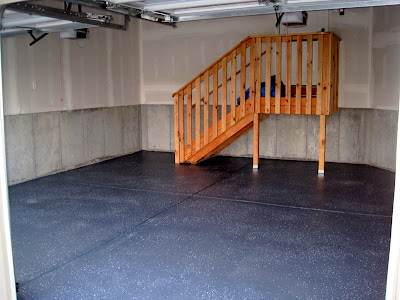
All done!!! for some reason it looks navy blu-ish in this picture, in real life it looks more grey :)
Total cost $80 (we already had paint rollers and brushes)
Now we need to sand and stain those steps, it's a never ending to do list! What's on your to-do list?

Monday, April 25, 2011

Staining Concrete Basement: Part 1

So, our new house has an unfinished basement. I have a thing about bare concrete. Outside, it's fine, but inside it kinda gives me the heebies. I hate how it feels on my feet, or even if I'm wearing socks, I hate how it smells, all dusty all the time, I basically hate it.

Well, since we're wanting to use the basement for more than storage (Exercise room, indoor playground for the kids in the winter, and an office of sorts, plus this is where all the food storage will live, and where I will grind my grains to make my bread (I sound like the little red hen right?lol)), we wanted to do a floor treatment.

We chose to do a concrete stain because it looks cool, and it's inexpensive.
The whole thing cost us about $85
So here's how we did it...

Step 1: SWEEP
Our basement was FULL of super fine dust/dirt. My SWEET Mom and Dad, who happened to be in town, and my sister Stephanie helped us get it all swept up. This was the most difficult, the photo below was taken with a flash because it was dark down there, and the flash caught all the dust in the air. We had a pretty good method where we worked together, to sweep piles, adn then my Dad came in behind us with the shop vac. We worked HARD sweeping for like 2-3 hours straight trying to get up all the dust.

Step 2: Clean/Etch
We used Quikcrete Bond-lok concrete cleaner, degreaser, and etcher, this was recommended at Lowes. We used one bottle for the entire basement, it cost $18. The reason you need to etch the concrete is because it opens up the pores of the concrete so it can absorb the stain. Follow the directions on the bottle.
This step takes about an hour to scrub all the floor and clean it up afterwards (rinse it). The rinsing was a challenge in the basement, we had to mop and rinse and mop rinse... and mop. You have to wear rubber boots and gloves, this stuff is nasty if you get it on your skin.
Drying after it's been etched:

Then, you have to let the etching dry overnight. This is the bare, dry concrete before the stain:
Step 3: Stain
We followed the directions on the can, get the concrete a little wet, and then apply the stain with a pump sprayer. This is kind of like water color painting. You know how when you paint with watercolors, you get your paper wet first? That way the paint will spread, and flow? Same kind of thing. We ran into some trouble with puddles because our floor isn't perfectly flat. Puddles are bad news.
This is the Vaquero Brown color we chose in Semi-transparent stain. Here is a link to all the colors available. (we bought ours at Lowes, I think around $25-28 a can, we used 2 full cans for our 900 square foot basement)


John, filling up the pump sprayer. We bought this pump sprayer at Lowes for $13, the lady said we should just throw it away when we're done with it. (I was so relieved because I thought we were going to have to buy a real paint sprayer for $100! Phew :)
John let me spray the stain while he went ahead of me and got the concrete wet. (We wished we had bought a second pump sprayer to distribute the water better, we used a bucket of water and a push broom to spread it around, I wouldn't recommend that method...next time....
I know...so cute right? My special work overalls, I've had these since I was fourteen, and they were my dads before that. and special rubber boots.
All done staining, looks kind of milky white-ish. Waiting for it to dry...stay tuned to see the results!!!