Wednesday, July 13, 2011

Bow Belt in MUSTARD yellow :)

So now I am itching to make more and more of these beauties! This Navy blue and White number (A Ross score for $5.99, no I am not joking) needed a little yellow accessory, so I made another bow belt :)
I know I look a smidge pregnant or something in the above photo, but I promise I'm not, the wind blew the dress so I look a little more plump than I am...forgive me :)
Close up :) I wanted this one to be more ruffled than the last one, so I added more to the length of the belt (fabric tube, not the elastic)
I love how ruffly it looks :) Now I am looking for more things to wear with it! :)
Have I convinced you you need to make one yet?!

Monday, July 11, 2011

Bow-Belt, Loose tutorial :)

So this is how I made the bow belt...I say loose tutorial because nothing I did here is exact, you can totally wing it and modify it to fit your needs :)

For the BELT:
1 piece of fabric that measures 9 in wide by your bra size x 1.3 ish, so my bra size is 34, and my piece of fabric was 44 in long {if you want more scrunchy/ruffly do more, if you want less...you get the idea}
1 piece of WIDE elastic{mine was 2.5 in wide} that measures your bra size {after you thread it through the belt you'll trim 1.5-2 inches off depending on how tight you want it, and where it's going to sit on your body.
Snaps or Velcro, I used 3 snaps in the back, they are using snaps at the stores too...if you do use snaps, I like the "snapsource" snaps because their prongs are extra long and will stab through the layers of elastic and velcro easier, though it is still a struggle and velcro would have been much easier...pick your poison :)
cut your fabric per your specific measurements, I wanted my belt to be 3.5-4 in. wide, so my fabric was 9 inches wide

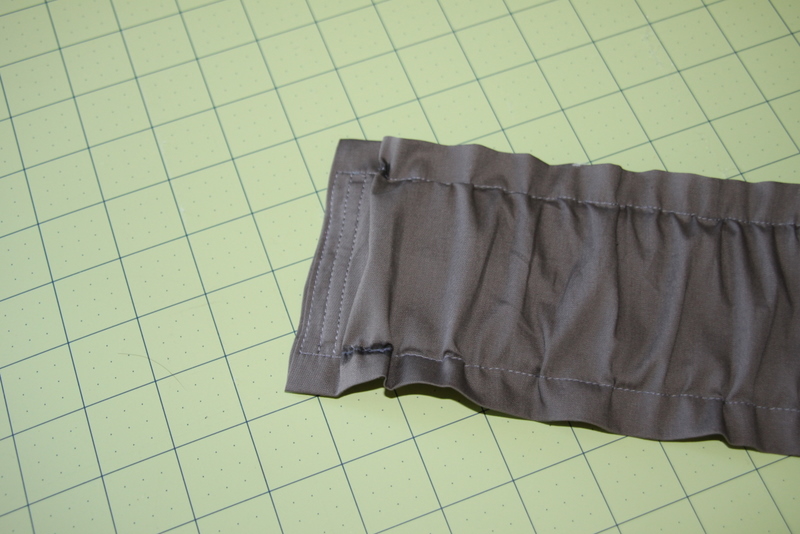
sew it into a tube and turn it right side out, press it with the seam in the middle of the back

Sew a straight seam about 5/8 from the edge, this is the part that will ruffle when your elastic is in, repeat for the other side :) so it looks like this:
Make sure your elastic will fit in between the seams
using a big safety pin, thread the elastic all the way through the tube
fold one end in and press it, sew it down with one end of elastic inside
Pull your elastic through and put it up to your body to see how tight you want it, then with the right amount of elastic out of the belt, sew a satin stitch (tight zig-sag stitch) down the end of the belt,
I put fray check on the end and then trim off the excess elastic {it's not pretty but It will be hidden by the velcro or snaps anyway :)
For the BOW:
One piece of fabric that is 4 x17 in (I wanted a bow that was 8 inches long)
one piece of felt that is 3.5x8 in
one piece of fabric that is 4x3
Sew the felt onto the folded piece of fabric and leave an opening for turning it right side out in the center of one of the sides, sew right on the line, like barely a millimeter onto the felt
snip the corners and turn right side out, sew the small piece of fabric into a tube adn turn it right side out, press them both
here's what the pressed bow piece should look like:
scrunch it up till you like the way it looks and sew it by hand, I like to sew through the middle then wrap a few times around the middle of the bow with my thread
wrap the small tube around the middle section and sew it on in the back, doesn't have to be pretty, just so its secure :)
Stitch it onto the middle of the belt, by whatever means works for you :) Mine does NOT look pretty, but it sure is secure :)

I also tacked down each corner of the bow to the belt so it wouldn't look funny, or crooked, or sag :)
I forgot to take photos, but I put 3 snaps in the back and...
TADA!!!! Super cute Bow belt!!1
Lovely right?
See this belt in Yellow HERE

Sunday, July 10, 2011

Bow Belt

I know my crafty posts have been lacking lately, but not because I haven't been crafting, it's just that things seem to take priority over documenting the cute stuff I'm working on, but here's a teaser for a belt I just made, and I'll post loose instructions and photos tomorrow {hopefully} about how I did it....cute.
My sister Stephanie bought a super cute belt with a big bow on the front from Rue 21, and I regretted not getting one too...
I loved this dress, but it needed a little su'm su'm to look complete, so using the idea of the big bow belt that my sister has, I made this cute grey belt to match my dress :) I LOOOOVE the way it turned out, and I think I'll have to make a few more in different colors!
I'll have a tutorial tomorrow to show you how I did it, it was much easier than I thought it would be, and I LOVE the final product! Stay tuned!
See the tutorial HERE
and the same belt HERE in Yellow :)

Friday, July 1, 2011

Sesame Chicken

I was in the mood for Sesame Chicken, but the recipe I usually use has you bread the chicken and then fry it, then coat it with the sauce...I wanted something more healthy and less time consuming, this came together in like 10 minutes :)
YUMMY Sesame Chicken
{Amy, do you love the napkin I used for the backdrop? I do! :) }

  • This recipe came from Food.com, posted by Jenny White
  • My modifications are in BLUE :)
  • {I started my rice in the rice cooker before I started cooking, and I had the chicken thawing all afternoon}
  • 6 boneless skinless chicken breast halves, pat dry with paper towels
  • 1/2 cup honey
  • 1/2 cup soy sauce
  • 1 cup water
  • 2 tablespoons cornstarch
  • 1/2-1 teaspoon ground ginger (fresh is better) {I used a dash of ginger powder, it was tasty}
  • 1/2-1 teaspoon red pepper flakes (optional)
  • 1 tablespoon toasted sesame seeds {Sesame Seeds can be pricey if you try to buy a small spice-sized container of them at the grocery store, but I bought mine in bulk from Honeyville Grains, 13 oz for $6.99}

  • {I added chopped onions, chopped garlic and about 2 minutes before it was ready I threw in some halved sugar snap peas}

  • Directions:
  • 1 Cut chicken breast into 1 inch strips or bite size pieces.
  • 2 Heat a large non-stick skillet that has been sprayed with Pam, over medium-high heat.{I put in some vegetable oil and little bit of sesame seed oil}
  • 3 Cook chicken for about 6 minutes or until no longer pink.
  • 4 Mix together honey, soy sauce, water, corn starch, ginger and red pepper flakes.
  • 5 Whisk until no corn starch lumps appear.
  • 6 Pour sauce mixture into skillet with chicken.
  • 7 Cook until sauce thickens slightly.
  • 8 You can add more water if sauce is too thick.
  • 9 Sprinkle with sesame seeds.
  • 10 Cover and simmer for 10 minutes or until chicken starts to soak up the sauce.

  • Serve over rice, ENJOY!!!